Most homeowners assume finding a water leak is straightforward. You see water, you find the pipe, you fix it. The reality is that understanding how emergency plumbers diagnose leaks reveals a much more complex process involving specialized tools, methodical testing, and years of hands-on experience. A leak behind a wall or under a concrete slab can go undetected for weeks while silently destroying your home's structure. Knowing what your plumber is actually doing when they arrive speeds up the process and helps you make smarter decisions before and during the repair.
Table of Contents
- Key takeaways
- How emergency plumbers diagnose leaks: the first steps
- Advanced leak detection tools plumbers rely on
- The confirmation and access process
- Why fast diagnosis prevents far worse problems
- Challenges that make leak diagnosis harder
- My honest take on emergency leak diagnosis
- Get professional leak diagnosis you can count on
- FAQ
Key takeaways
| Point | Details |
|---|---|
| Early signs matter | Damp walls, musty odors, and unexplained spikes in water bills often signal hidden leaks worth investigating immediately. |
| Multiple tools are used | Emergency plumbers combine acoustic sensors, thermal imaging, and tracer gas to locate leaks accurately without unnecessary demolition. |
| Pressure testing confirms leaks | Isolating plumbing zones through pressure tests is a critical first step before any advanced detection tool is deployed. |
| Speed prevents bigger damage | Rapid diagnosis and repair directly reduces mold growth, structural damage, and inflated utility costs. |
| Smart tech supports, not replaces | Smart water monitors help flag problems early, but they cannot substitute for a plumber's diagnostic expertise on the ground. |
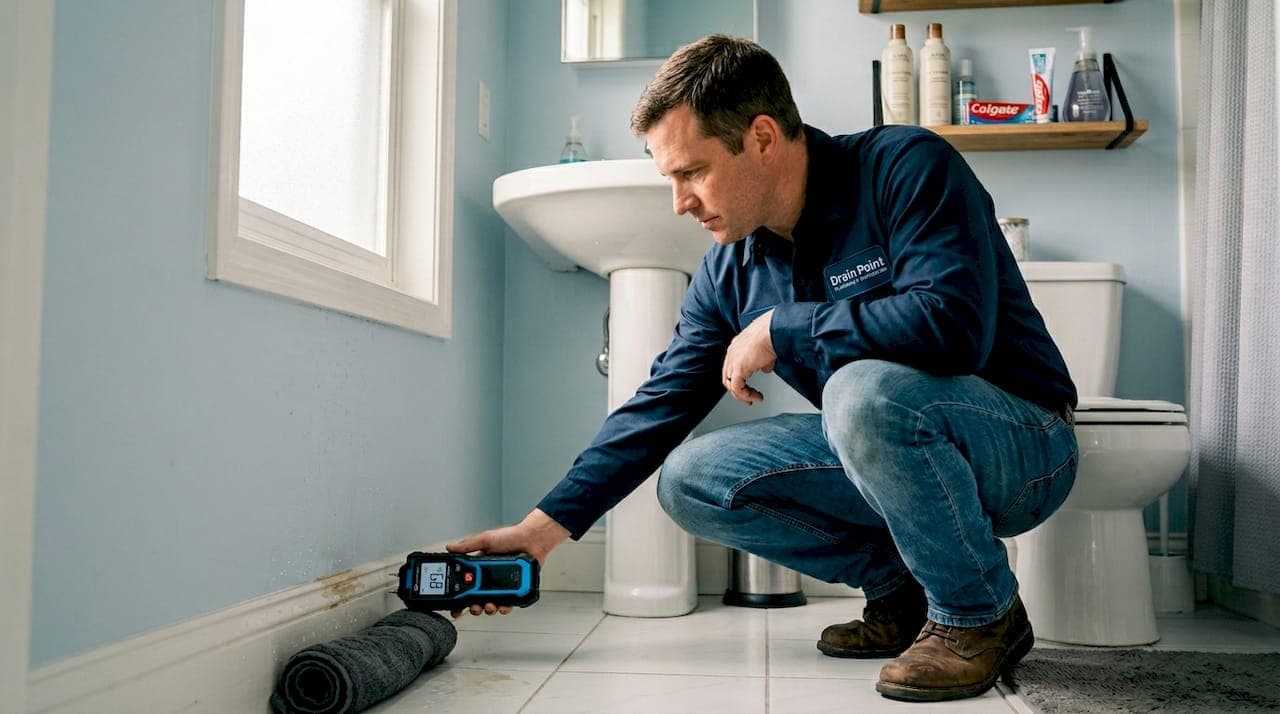
How emergency plumbers diagnose leaks: the first steps
When an emergency plumber arrives at your home, they are not just looking for wet spots. The investigation starts the moment they walk through the door. The conversation you have with them in the first few minutes is actually part of the diagnosis.
Plumbers ask specific questions: When did you first notice the issue? Has your water bill increased recently? Do you hear running water when everything is off? These details narrow down the search area significantly before any tool is picked up. Early homeowner observations like damp walls, unusual water bills, and musty odors are critical triggers for emergency plumber involvement and give the technician a starting point.
After the interview, the plumber looks for visible clues. These typically include:
- Discoloration or bubbling on walls and ceilings
- Soft or warped flooring, especially near bathrooms or the kitchen
- Mold or mildew patches in areas that are not typically humid
- The sound of water moving inside walls when all fixtures are off
- Unexplained drops in water pressure throughout the home
Once visible and audible signs are mapped, the plumber runs a pressure test. This process isolates sections of the plumbing system and measures whether pressure holds steady or drops. A pressure drop confirms a leak is present in that zone, which immediately narrows the search to a specific section of pipe. Pressure testing isolates sections of plumbing to confirm presence of leaks before any advanced tools are deployed.
Pro Tip: Before your plumber arrives, take a photo of your water meter reading and note whether the dial is moving while all water is turned off. This takes two minutes and gives your plumber a concrete data point that can cut their diagnostic time significantly.

Advanced leak detection tools plumbers rely on
Once a zone is identified as problematic, emergency plumbers move into targeted detection mode. This is where the technology gets genuinely impressive, and where the difference between a skilled plumber and an average one becomes obvious.
Acoustic leak detection
Acoustic sensors detect the sound of water escaping pipes and are one of the most common initial tools in emergency plumbing. The device picks up the distinct frequency of water under pressure forcing its way through a crack or joint. The plumber moves the sensor along walls, floors, or directly on accessible pipes, listening for intensity spikes that point to the exact escape location.
The limitation is real: acoustic detection works best when the pipe material and surrounding structure allow sound to travel. Dense concrete or heavy insulation can muffle the signal, which is why this method is rarely used alone.
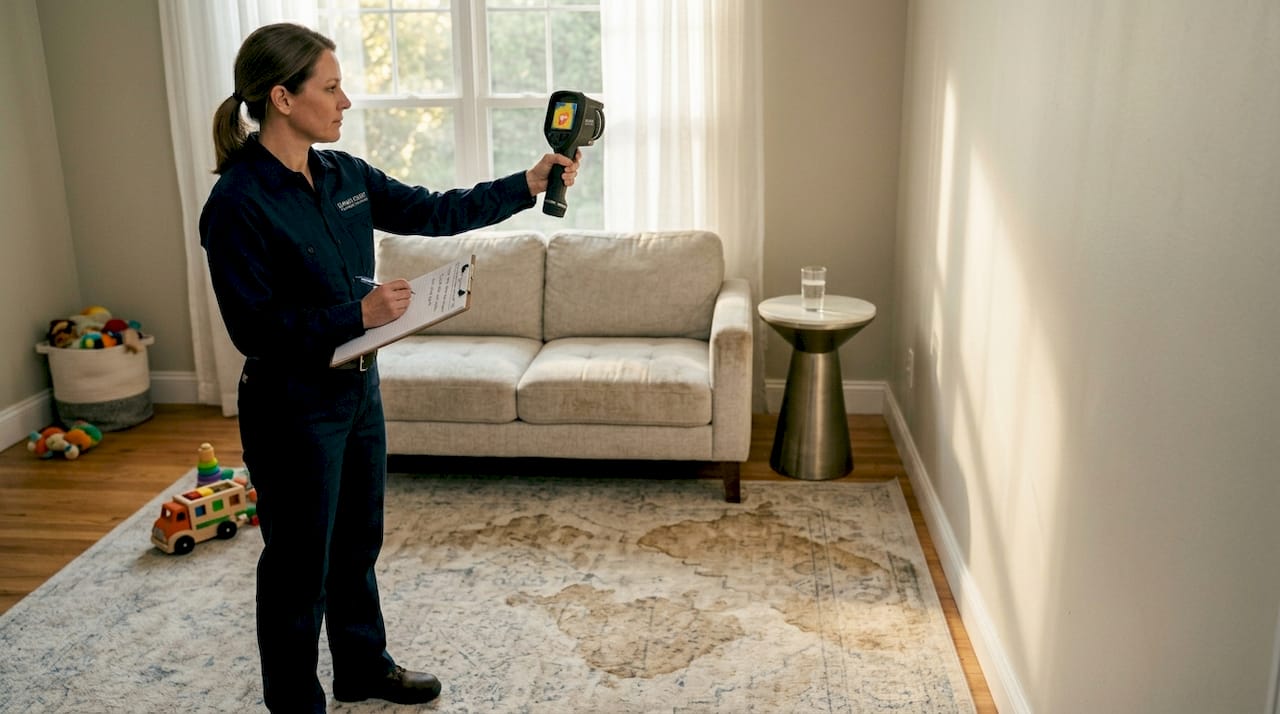
Thermal imaging cameras
Thermal cameras detect temperature differences in walls, floors, and ceilings. An active leak creates a temperature anomaly because water cools or warms the surrounding materials relative to the ambient environment. The plumber scans the surface with a handheld camera and watches for color gradients on the display that indicate moisture.
Thermal imaging can be ineffective in well-insulated or temperature-stable environments where the contrast between the leak and its surroundings is too small to register clearly. Experienced plumbers know this and combine thermal imaging with at least one other method.
Tracer gas methods
Tracer gas is the most precise tool in the kit and the one most homeowners have never heard of. The plumber introduces a safe hydrogen-nitrogen mix into the pipe system. The gas escapes through the same crack or hole the water does, then rises through the flooring or wall material. A handheld sensor detects the gas at the surface.
What makes this method particularly valuable is the technique involved. Expert plumbers focus sensors on joints and grout lines rather than solid tile surfaces, because the gas diffuses and rises more readily through those gaps. This allows minimally invasive leak location even under screed and thick insulation without breaking open large sections of floor or wall.
| Detection method | How it works | Best used for | Key limitation |
|---|---|---|---|
| Acoustic sensors | Picks up sound of escaping water | Surface pipes, accessible walls | Muffled by insulation or dense materials |
| Thermal imaging | Detects temperature anomalies | Walls, ceilings, wet areas | Needs temperature contrast to work |
| Tracer gas | Gas escapes through leak, detected at surface | Under-slab, insulated pipes, tiled floors | Requires pipe access to introduce gas |
| Pressure testing | Measures pressure drop in isolated pipe zones | System-wide confirmation of leak presence | Does not locate the leak precisely |
Pro Tip: If a plumber only uses one tool and declares the job done without confirming the find through a second method, that is a red flag. Accurate diagnosis almost always involves at least two verification steps.
The confirmation and access process
After identifying the most probable leak location, the plumber does not immediately start tearing things apart. There is a deliberate confirmation step that saves homeowners from unnecessary damage and cost.
- Isolate and retest. The plumber shuts off water to the suspected zone and reruns a pressure test. If pressure stabilizes, the leak is confirmed in that section.
- Probe accessible points first. Before cutting into walls, the plumber checks any accessible cleanouts, inspection ports, or removable panels near the suspected area.
- Target joints and connection points. Leaks most commonly occur at joints, fittings, and connection points rather than along the middle of a pipe. The plumber inspects these areas with a focused sensor or visual probe.
- Minimal access entry. If wall or floor access is required, the plumber makes the smallest possible opening to confirm the leak visually before widening the work area.
- Document everything. Photos and notes of the leak location, pipe condition, and surrounding damage are taken before any repair begins. This matters for insurance claims and helps the homeowner understand the scope of what was found.
- Customer communication. Before starting repairs, a clear explanation of what was found, how confident the diagnosis is, and what the repair involves should happen. If a plumber skips this step, ask for it.
This structured process protects your home from the "exploratory demolition" approach that less experienced plumbers sometimes default to.
Why fast diagnosis prevents far worse problems
Speed in emergency leak diagnosis is not about rushing. It is about stopping a problem that grows every hour it is left unaddressed. Rapid response by emergency plumbers directly mitigates risks that most homeowners underestimate until they are standing in them.
Here is what delayed leak detection actually leads to:
- Mold growth can begin within 24 to 48 hours of water contact with organic materials like drywall and wood framing. Mold remediation costs often exceed the original plumbing repair by a significant margin.
- Structural weakening happens when water saturates subfloor materials, wall framing, or foundation elements over days or weeks.
- Utility bill increases from a slow leak can add hundreds of dollars to monthly costs without any visible sign of where the water is going.
- Secondary damage to insulation, electrical components, and flooring compounds the repair cost with every passing day.
Smart water monitoring systems are growing in popularity for early alerts, but they do not replace professional plumbers for actual diagnosis and repair. They are a valuable early warning system, not a substitute for someone who can physically locate and fix the problem.
If you are a homeowner, the smartest preventive step you can take is knowing when to call. If your meter moves with all water off, if you hear water running in walls at night, or if your bills spike without explanation, do not wait. Learn what qualifies as a plumbing emergency so you can act before minor leaks become major disasters.
Challenges that make leak diagnosis harder
Not every leak diagnosis goes smoothly. Emergency plumbers regularly face conditions that complicate even the best detection equipment.
- Heavy insulation around pipes absorbs both sound and temperature contrast, limiting acoustic and thermal methods simultaneously.
- Slab foundations make it nearly impossible to reach pipes without specialized equipment, and vibrations from the surrounding structure can confuse acoustic readings.
- Mixed pipe materials in older homes, where copper meets galvanized steel or PVC, create different acoustic signatures that are harder to interpret.
- Finished basements and tiled floors block direct access and require tracer gas or targeted demolition to locate leaks with confidence.
Combination approaches are often necessary because acoustic and thermal methods alone can fail in complex building structures. This is why experience matters as much as equipment. A plumber who has seen hundreds of leak jobs knows which tool to reach for first based on the home's construction type, not just a generic protocol.
Knowing how to find a 24-hour plumber who brings this combination of tools and experience to the job is worth researching before an emergency happens, not during one.
My honest take on emergency leak diagnosis
I have been in plumbing long enough to say this plainly: most homeowners are genuinely surprised at how involved emergency leak diagnosis actually is. I have seen people expect a plumber to walk in, glance at a wall, and pinpoint a leak in minutes. That assumption leads to frustration when the process takes an hour and involves multiple tests.
What I have learned is that the plumbers who do this well are the ones who combine technology with patient, methodical thinking. The best emergency leak diagnoses I have seen were not the fastest ones. They were the ones where the plumber slowed down enough to confirm a finding twice before recommending any demolition.
The other thing I would tell every homeowner: smart home water sensors are genuinely useful. But smart tech supports, not replaces what a trained plumber brings to your home. An alarm tells you something is wrong. A skilled plumber tells you exactly what, where, and what it takes to fix it permanently.
If a plumber cannot explain their diagnostic process to you in plain language, that is a problem. The best ones I know can walk you through every step, and they welcome the questions.
— Kirk
Get professional leak diagnosis you can count on
When you are staring at a water stain on your ceiling or watching your meter spin with no explanation, you need more than a guess. Drainpointplumbing has over 15 years of emergency plumbing experience serving homeowners across Santa Barbara County, and the team brings the full toolkit: acoustic detection, thermal imaging, tracer gas, and pressure testing to every job.
Whether you need a leak confirmed, a pipe repaired, or full water damage restoration, Drainpointplumbing handles it all under one roof. Their residential plumbing services cover everything from pinpoint leak repairs to complete repiping, with 24/7 availability for genuine emergencies. If you are ready to stop guessing and get answers, request a free quote and get a trained technician on site fast.
FAQ
How do plumbers find hidden leaks without breaking walls?
Emergency plumbers use acoustic sensors, thermal imaging cameras, and tracer gas to locate leaks without opening walls. These tools let plumbers pinpoint the source before making any access cuts.
What is the first thing an emergency plumber does when diagnosing a leak?
The plumber interviews the homeowner about symptoms, then conducts a pressure test to isolate which plumbing zone contains the leak. This narrows the search area before any specialized detection equipment is used.
How accurate is tracer gas for detecting plumbing leaks?
Tracer gas is one of the most precise methods available, capable of locating leaks under concrete slabs and tiled floors with minimal demolition. Plumbers focus sensors on grout lines and joints for the most reliable readings.
Can smart water monitors replace an emergency plumber?
Smart water monitors provide useful early alerts but cannot diagnose or repair leaks on their own. Professional plumbers are still required to physically locate the leak source and carry out repairs.
How fast should I call a plumber if I suspect a leak?
Call immediately if your water meter moves while all water is off, if you hear running water inside walls, or if your water bill spikes without explanation. Mold can begin forming within 24 to 48 hours of water contact with wall and floor materials.