A temporary fix for a leaking pipe at home means stopping or controlling an active leak using pipe clamps, epoxy putty, repair tape, or rubber patches until a licensed plumber can make a permanent repair. Water damage compounds fast. A single pinhole leak left unaddressed for 24 hours can saturate subfloor material, soak insulation, and create conditions for mold growth within 48 hours. The good news is that most homeowners can apply a reliable temporary repair in under 30 minutes using materials from a hardware store or even a kitchen drawer. These stopgap measures, known in the trade as emergency pipe repairs, are not permanent solutions. They buy you time, protect your home, and reduce the cost of damage before a professional arrives.
What are the best tools for a temporary pipe leak repair?
Pipe clamps with internal rubber pads are among the fastest temporary fixes available to homeowners, capable of sealing small leaks within minutes. Having the right materials on hand before a leak happens is the difference between a 15-minute fix and a flooded kitchen. Below are the core items every homeowner should keep accessible.
- Pipe repair clamps: Sold at Home Depot and Lowe's, these consist of a rubber sleeve and a metal band that tightens around the pipe. They work on copper, galvanized steel, and PVC.
- Epoxy putty: Brands like J-B Weld SteelStik or Oatey Fix-It Stick are two-part compounds you knead together and press over a leak. Best suited for metal pipes.
- Pipe repair tape: Silicone self-fusing tape (such as X-Treme Tape) bonds to itself without adhesive and creates a watertight wrap. Teflon tape works for threaded joints. Duct tape is a last resort for dry surfaces only.
- Rubber patches: A cut section of rubber hose or a purpose-made patch, held in place with hose clamps or adjustable pipe clamps.
- Adjustable hose clamps: Standard hardware that secures rubber patches or sleeves over a leak point.
- Pipe sleeve kits: Pre-packaged kits like the Oatey Pipe Repair Kit include a rubber sleeve and clamps sized for common pipe diameters.
Pipe material matters when choosing your fix. Epoxy putty bonds well to copper and galvanized steel but does not adhere reliably to PVC or PEX. Silicone tape works across all pipe types. Clamps are material-agnostic as long as you match the clamp diameter to the pipe.
Pro Tip: Build a basic plumbing emergency kit and store it under your kitchen sink. Include one pipe repair clamp in 1/2-inch and 3/4-inch sizes, a stick of epoxy putty, a roll of silicone self-fusing tape, and a pair of rubber gloves. This kit costs under $30 and can prevent thousands of dollars in water damage.
How to use a pipe clamp for a quick pipe leak repair
Pipe clamps are the most reliable method for quick pipe leak repair on straight pipe sections with small cracks or holes. Follow these steps precisely to get a seal that holds until your plumber arrives.
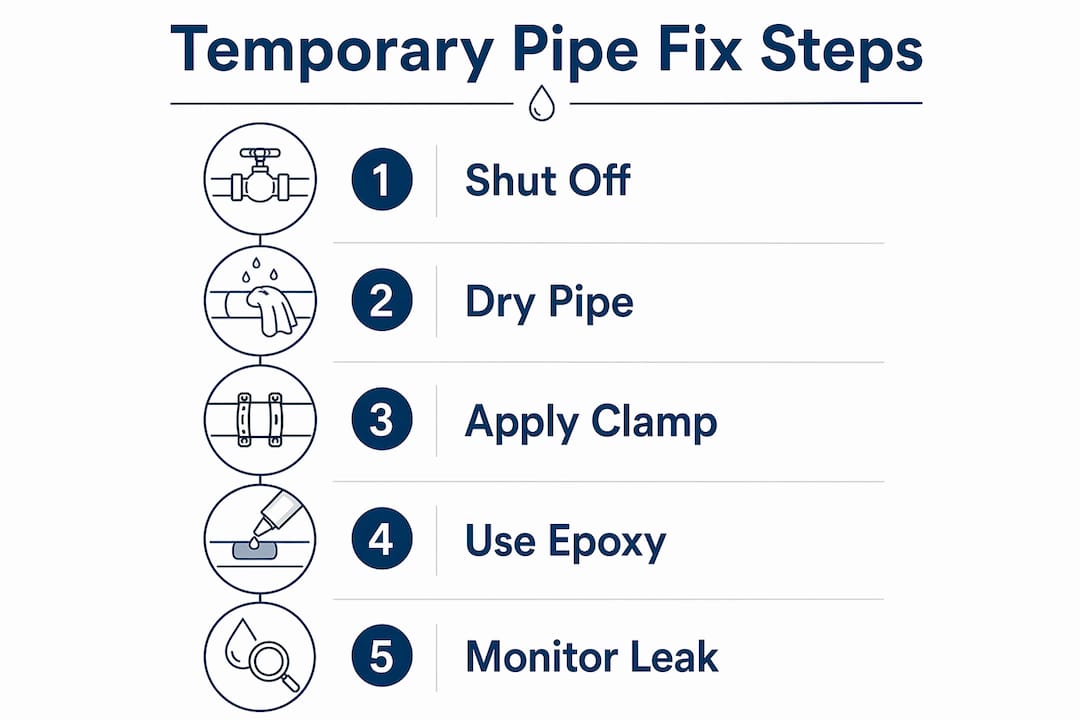
- Shut off the water supply. Turn off the local shutoff valve under the sink or behind the wall. If you cannot locate it, shut off the main valve at the meter. This is the single most important step in any emergency pipe leak repair.
- Locate the leak precisely. Dry the pipe completely with a towel. Run your hand along the pipe slowly to find the exact point of the leak. Mark it with a pencil if needed.
- Clean the pipe surface. Use sandpaper or a wire brush to remove rust, mineral deposits, or debris from a 3-inch area around the leak. A dirty surface prevents the rubber sleeve from forming a tight seal.
- Position the rubber sleeve. Center the rubber pad of the clamp directly over the leak point. The rubber must fully cover the hole or crack with at least 1/2 inch of overlap on each side.
- Tighten the clamp bolts. Use a screwdriver or wrench to tighten the clamp bolts evenly. Alternate between bolts to apply even pressure. Stop when the rubber compresses firmly against the pipe.
- Restore water pressure slowly. Turn the water supply back on gradually. Watch the clamp area for 2 to 3 minutes. A small amount of initial seepage is normal as the rubber seats itself.
- Monitor for the next 24 hours. Check the repair every few hours. Place a dry paper towel under the clamp so any moisture is immediately visible.
Common mistakes include overtightening, which can crack PVC pipes, and applying the clamp over a dirty or wet surface. Clamps are not appropriate for leaks at pipe joints, elbows, or fittings. For those locations, epoxy putty or a slip coupling is a better option.
Pro Tip: If the pipe is copper and the leak is at a joint, do not use a clamp. The joint geometry prevents the rubber sleeve from seating flat. Use epoxy putty instead and call a plumber the same day.

How to apply epoxy putty and repair tape to stop a pipe leak temporarily
Epoxy putty is effective for sealing small holes and pinhole leaks on metal pipes, specifically copper and galvanized steel. Industrial repair systems like STOP IT® can cure in 30 minutes and withstand high pressure, but those are designed for professional and industrial use. For homeowners, standard two-part epoxy putty from a hardware store is the practical choice.
- Shut off the water and dry the pipe. No epoxy product will bond to a wet surface. Use a heat gun or hair dryer on low to fully dry the repair area if needed.
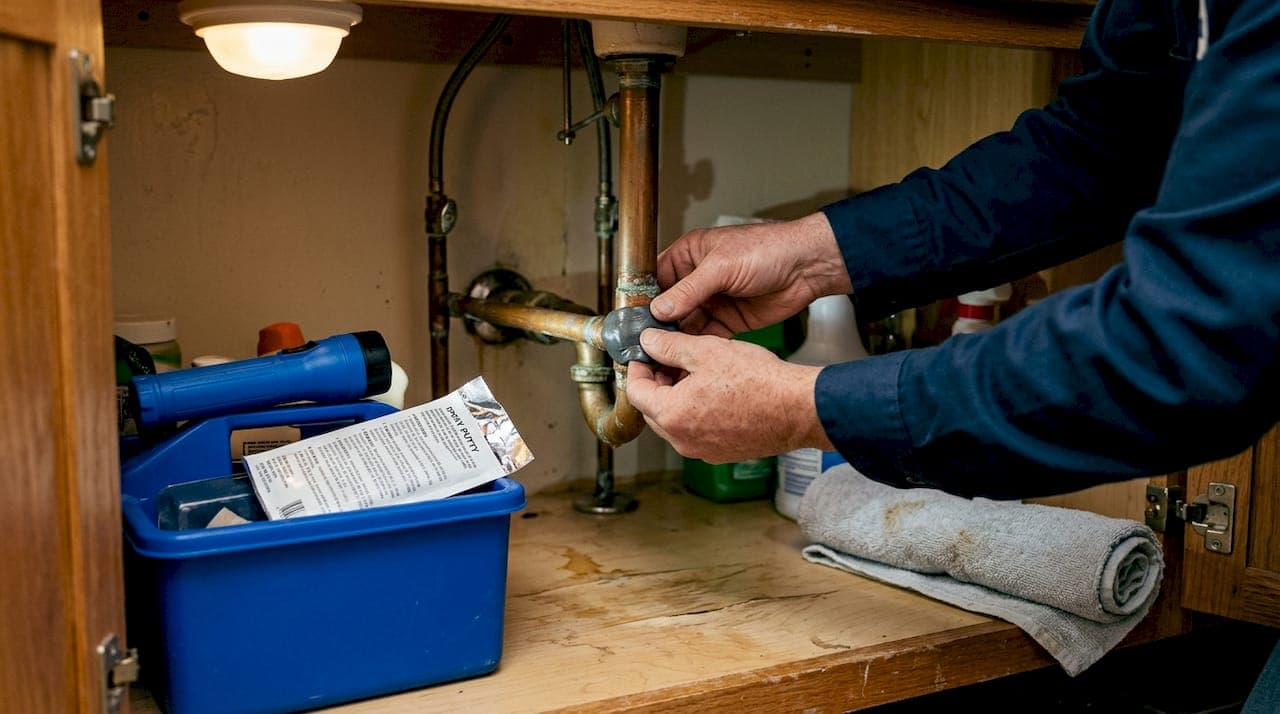
- Cut and knead the epoxy putty. Cut a section from the stick, then knead the two-part compound together with your fingers until the color is uniform. Wear gloves. Most brands give you 3 to 5 minutes of working time before the putty begins to harden.
- Press the putty firmly over the leak. Push the mixed putty directly onto the hole and spread it outward in a 1-inch radius. Press hard to eliminate air pockets. Smooth the edges so the putty tapers onto the pipe surface.
- Allow full curing time. Most epoxy putties reach handling strength in 20 to 25 minutes but require 1 hour for a water-resistant cure. Do not restore water pressure before the manufacturer's stated cure time.
- Wrap with silicone tape as a secondary layer. Once the putty has cured, wrap two to three layers of self-fusing silicone tape over the repair for added protection. This is especially useful if the pipe is in a high-humidity area.
For tape-only repairs, duct tape, Teflon tape, and electrical tape can contain leaks short-term but only when applied to a completely dry, clean surface. Teflon tape is best for threaded joints. Silicone self-fusing tape is the strongest option for straight pipe sections. Duct tape is the weakest choice and will fail within hours under water pressure. Check the repair every 30 minutes for the first two hours.
When to use rubber patches, pipe sleeves, and household workarounds
Rubber patches and pipe sleeves fill the gap between clamps and tape for specific leak scenarios. Each method has a clear use case and a clear limit.
- Rubber patches with hose clamps: Cut a section of rubber from an old garden hose or buy a rubber patch kit. Wrap the patch around the leak and secure it with two hose clamps, one on each side of the hole. This works well on straight sections of drain pipe where water pressure is low.
- Pipe sleeves: Products like the Oatey Pipe Repair Sleeve are pre-formed rubber sleeves that slide over a pipe section and clamp in place. They are faster to install than a patch and work on pipes up to 2 inches in diameter.
- Slip couplings: For a section of pipe that is cracked along several inches, a slip coupling can temporarily replace the damaged section. This requires cutting out the bad pipe and sliding the coupling in place. It is the most involved DIY fix but the most durable short-term option.
- Household redirection methods: Buckets, plastic sheeting, and rigid surfaces like MDF can redirect dripping water away from floors, cabinets, and electrical panels. These do not stop the leak but prevent secondary damage while you prepare a proper fix.
Every one of these methods is short-term. Temporary fixes buy time and reduce emergency plumbing costs, but they are not substitutes for permanent repair. Check any improvised fix every two to three hours and never leave it unmonitored overnight without a bucket in place.
Troubleshooting your repair and knowing when to call a plumber
A temporary fix that is failing will show clear signs. Catching those signs early prevents a minor repair from becoming a major restoration job.
- Continued dripping or seepage around the repair site means the seal did not form correctly. Shut off the water again and reapply the fix with a cleaner, drier surface.
- Damp drywall, soft flooring, or discoloration near the pipe indicates water has already spread beyond the visible leak. This is a sign the damage is larger than it appears.
- Mold smell within 48 hours of a leak means moisture has reached a cavity. Moisture hidden in building cavities causes ongoing structural damage that professionals assess with moisture meters and thermal imaging cameras.
- Pressure drop throughout the house suggests the leak is larger than a single pinhole and may involve a section of pipe that needs replacement.
A temporary repair that holds for 12 hours does not mean the underlying pipe is stable. Pipe movement, water pressure fluctuations, and temperature changes can cause a patched area to fail without warning. Schedule professional repair within 24 to 48 hours of any temporary fix.
Water damage from leaking pipes extends well beyond visible drips. Moisture spreads into cavities and causes mold and structural issues that are far more expensive to fix than the original pipe. If you suspect water has reached your walls or subfloor, photograph everything before drying it out. That documentation matters if you file a homeowner's insurance claim.
Key takeaways
A temporary pipe leak fix works only when you shut off the water first, use the right material for your pipe type, and schedule professional repair within 24 to 48 hours.
| Point | Details |
|---|---|
| Shut off water immediately | Turn off the local or main valve before applying any temporary fix to prevent further damage. |
| Match fix to pipe material | Use epoxy putty for metal pipes and silicone tape or clamps for PVC and PEX. |
| Clean and dry the surface | No clamp, putty, or tape will seal a wet or dirty pipe surface reliably. |
| Monitor every few hours | Check all temporary repairs frequently since pressure changes can cause them to fail without warning. |
| Call a plumber within 48 hours | Temporary fixes are stopgap measures. Permanent repair prevents mold, structural damage, and higher costs. |
What I've learned after 15 years of watching homeowners handle pipe leaks
Kirk here. After more than 15 years working with homeowners across Santa Barbara County, the pattern I see most often is not the wrong fix. It is the delayed fix. Someone notices a drip, wraps it in duct tape, and forgets about it for a week. By the time they call us, the cabinet floor is soft, the drywall is stained, and what would have been a $200 pipe repair has become a $1,500 restoration job.
The second most common mistake is skipping the water shutoff. I have watched homeowners try to apply epoxy putty to a pipe that still has pressure running through it. The putty never cures properly, the leak continues, and they call us frustrated that "the product didn't work." The product worked fine. The preparation did not.
My honest advice: treat a pipe leak the same way you treat a car warning light. You would not drive 500 miles on a low oil warning. Do not run your home for a week on a duct tape patch. Use the clamp or putty to buy yourself 24 hours, then call a plumber. Understanding how emergency plumbers diagnose leaks will also help you communicate the problem clearly when you make that call, which speeds up the repair.
One more thing: keep a plumbing emergency kit under your sink. A $25 kit has saved homeowners I know from $3,000 in water damage. That is the best return on investment in home maintenance I can point to.
— Kirk
When you need more than a temporary fix, Drainpointplumbing is ready
Drainpointplumbing provides full-service residential plumbing repairs across Santa Maria and Santa Barbara County, including permanent pipe repairs, repiping, and emergency leak response available 24 hours a day, 7 days a week. If your temporary fix is holding but you know the pipe needs professional attention, do not wait for it to fail again. The team at Drainpointplumbing has over 15 years of experience diagnosing and repairing leaks of every type, from pinhole copper pipe failures to cracked PVC drain lines. Senior and military discounts are available. Request a free quote today and get a permanent solution scheduled before your temporary repair runs out of time.
FAQ
What is the fastest temporary fix for a leaking pipe?
A pipe repair clamp with an internal rubber pad is the fastest option, sealing small leaks in minutes when applied to a clean, dry pipe surface. For pinhole leaks on metal pipes, epoxy putty is a close second with a cure time of 20 to 30 minutes.
Can I use duct tape to stop a pipe leak temporarily?
Duct tape can slow a drip on a completely dry pipe surface but will fail quickly under water pressure. Silicone self-fusing tape is a far more reliable option and holds significantly longer than duct tape.
How long will a temporary pipe repair last?
Most temporary fixes last between a few hours and a few days depending on water pressure, pipe movement, and the quality of the application. No temporary fix should be treated as a permanent solution.
When should I call a plumber instead of doing a DIY fix?
Call a plumber immediately if the leak is at a joint or fitting, if water has reached your walls or flooring, if you notice a pressure drop throughout the house, or if the pipe shows signs of corrosion beyond the leak point.
Does a leaking pipe always cause mold?
Not always, but moisture that reaches wall cavities or subfloor material can create mold conditions within 48 hours. Rapid drying and professional moisture assessment are the only reliable ways to confirm whether hidden damage has occurred.